Fluffy Red Velvet Cake
Imagine sinking your teeth into a moist and decadent dessert that’s as visually stunning as it is delicious. You’re about to experience the ultimate treat: a fluffy red velvet cake that’s sure to impress.
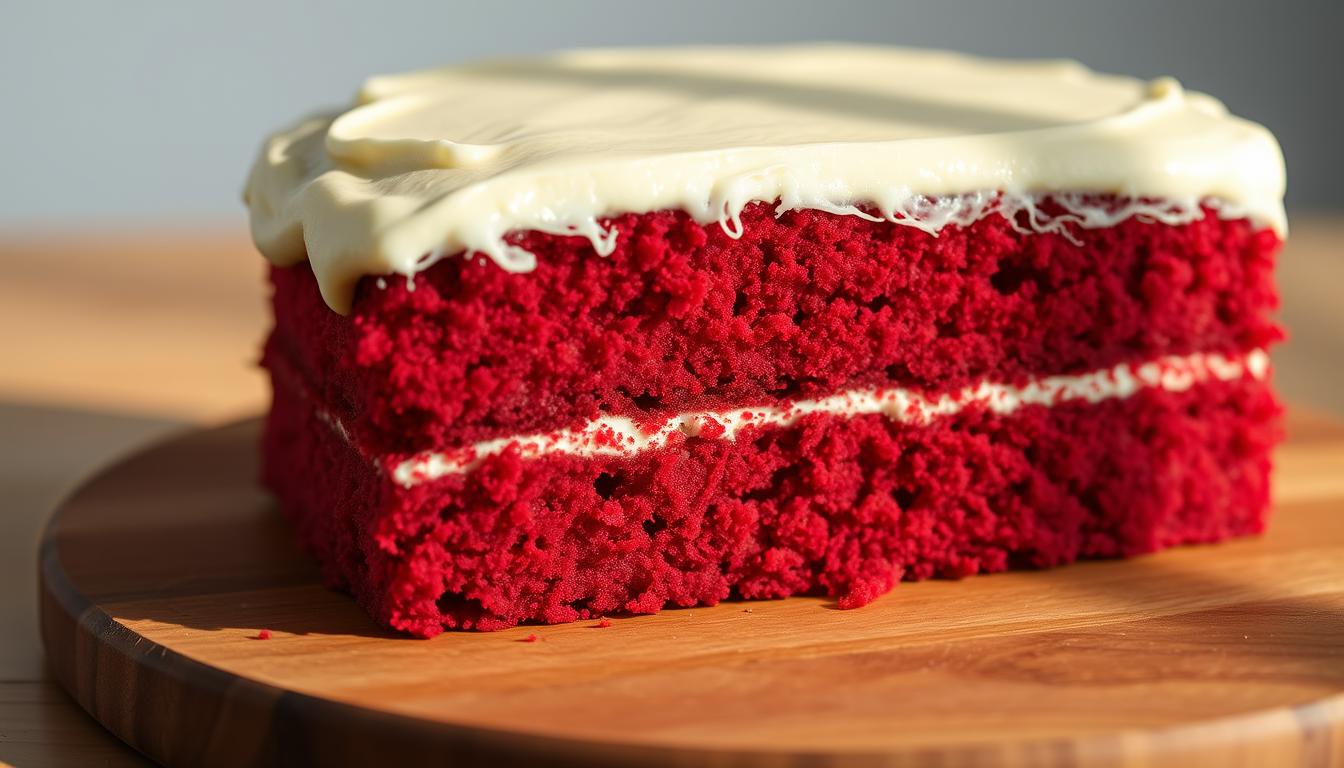
This isn’t just any cake; it’s a masterclass in texture and flavor, featuring a silky, luscious cream cheese frosting and a tender crumb that’s achieved by using high-quality ingredients, like buttermilk, in our buttermilk cake recipe.

The fluffy red velvet cake is a beloved dessert for many, and its popularity stems from its unique balance of flavors and velvety texture. By focusing on the quality of ingredients and precise preparation, you can create this delightful treat at home.
The History and Charm of Red Velvet Cake
Red velvet cake, a classic Southern dessert, has a history as rich as its flavor. You might be wondering what makes this cake so special. Let’s dive into its origins and unique characteristics.
Origins of This Beloved Dessert
The red velvet cake originated in the United States, specifically in the Southern region. Initially, it was known for its subtle cocoa flavor and a reaction between the non-Dutched cocoa powder and acidic ingredients like buttermilk and vinegar, which gave it a reddish-brown hue. Traditionally, red food coloring was not used; the cake’s color was a result of the chemical reaction. This unique process contributed to its distinct taste and appearance.

What Makes Red Velvet Unique
The unique characteristics of red velvet cake are largely due to its ingredients, particularly the use of buttermilk and vinegar, which react with the cocoa powder to give the cake its signature color and flavor. The buttermilk cake recipe is a crucial component, providing moisture and tenderness. The combination of these ingredients results in a cake that is both moist and flavorful, with a subtle tanginess that sets it apart from other desserts.
Essential Ingredients for the Perfect Red Velvet Cake
Crafting the perfect red velvet cake begins with understanding the importance of its key components. The quality and combination of these ingredients are what set a great red velvet cake apart from a good one.
The Role of Cocoa Powder
Dutch processed cocoa powder is a crucial ingredient in red velvet cake, providing a deep, rich chocolate flavor. Using high-quality cocoa powder ensures that your cake has a complex and satisfying taste. The cocoa powder also contributes to the cake’s distinctive red color when combined with the red food coloring.

Buttermilk: The Secret to Moisture
Buttermilk is another essential ingredient that adds moisture and tenderness to the cake. Its acidity reacts with the baking soda to help the cake rise, giving it a light and fluffy texture. If you don’t have buttermilk, you can make a substitute by mixing milk with vinegar or lemon juice.
Choosing the Right Red Food Coloring
The vibrant red color of red velvet cake is achieved with red food coloring. It’s essential to choose a high-quality, gel or paste food coloring to get the desired shade without affecting the cake’s texture. The amount of coloring needed may vary depending on the brand and type used.
Quality Flour and Leavening Agents
Using the right type of flour and leavening agents is vital for the cake’s structure and rise. All-purpose flour provides the necessary strength, while baking powder and baking soda ensure that the cake rises properly. Sifting these dry ingredients together helps to incorporate air and ensure even distribution.
By focusing on these essential ingredients, you’ll be well on your way to baking a red velvet cake that’s both delicious and visually stunning.
Equipment You’ll Need
Before you start baking your red velvet cake, it’s essential to have the right equipment. Having the correct tools not only makes the process smoother but also ensures your cake turns out as expected.
Baking Pans and Sizes
For a standard red velvet cake, you’ll need two 9-inch round baking pans. Ensure they’re greased and floured to prevent the cake from sticking. You can use either non-stick pans or regular pans with a generous greasing. Be sure to dust them lightly with flour for an extra layer of protection.
Mixing Tools and Appliances
A stand mixer or a large mixing bowl with an electric mixer is necessary for creaming butter and sugar, beating eggs, and mixing batter. You’ll also need measuring cups, spoons, and a whisk for combining dry ingredients. A rubber spatula is handy for scraping down the sides of the bowl.
Other Helpful Gadgets
Other useful tools include a kitchen scale for precise measurements, an oven thermometer to ensure the correct oven temperature, and a cooling rack for cooling your cakes. Using the right equipment will make a significant difference in the quality of your red velvet cake.
| Equipment | Purpose |
|---|---|
| 9-inch round baking pans | Baking the cake layers |
| Stand mixer or electric mixer | Creaming butter and sugar, beating eggs |
| Measuring cups and spoons | Accurate measurement of ingredients |
| Rubber spatula | Scraping down the sides of the bowl |
| Oven thermometer | Ensuring the correct oven temperature |
Preparing Your Kitchen and Ingredients
Preparing your kitchen and ingredients is a crucial step in making a perfect red velvet cake. A well-organized kitchen not only makes the baking process more enjoyable but also ensures that your cake turns out as expected. To start, you’ll need to gather all the necessary ingredients and equipment.
Setting Up Your Workspace
Begin by clearing a large, flat surface in your kitchen. This will be your workspace where you’ll measure out ingredients and mix your cake. Ensure it’s clean and dry to prevent any contamination or issues with your ingredients. Organize your ingredients and tools within easy reach to streamline your baking process.
Measuring Ingredients Accurately
Accurate measurement is crucial in baking. Use a digital scale to weigh your ingredients, especially dry ones like flour, to ensure precision. Measuring cups can be used for liquids. Make sure to level off your dry ingredients to avoid adding too much, which can affect the texture of your cake.
Bringing Ingredients to Room Temperature
Most recipes, including this red velvet cake recipe, require ingredients to be at room temperature. This ensures that they mix together smoothly and evenly. Take out your eggs, butter, and buttermilk about an hour before you start mixing. This simple step can make a significant difference in the final texture and consistency of your cake.
Step-by-Step Red Velvet Cake Recipe
Making a red velvet cake from scratch is simpler than you think with this step-by-step guide. Follow these instructions to create a deliciously moist and flavorful cake that’s perfect for any occasion.
Creaming Butter and Sugar
Begin by creaming together butter, oil, and sugar with a hand mixer or stand mixer for 2-3 minutes. This process incorporates air into the mixture, making your cake lighter and fluffier. Ensure you scrape down the sides of the bowl to include all ingredients.
Adding Eggs and Vanilla
Add eggs one by one, mixing well between each addition. This ensures that the eggs are fully incorporated and the mixture remains smooth. Add vanilla extract and mix until combined.
Combining Dry Ingredients
In a separate bowl, whisk together flour, cocoa powder, and other dry ingredients. This step ensures that your cake has an even distribution of ingredients, which is crucial for the texture and flavor.
Incorporating Wet Ingredients
Alternate between adding the dry ingredients and wet ingredients (like buttermilk) to the butter mixture, beginning and ending with the dry ingredients. Mix until just combined to avoid overmixing.
Final Mixing and Pan Preparation
Once all ingredients are incorporated, divide the batter evenly between prepared pans. Smooth the tops and tap the pans gently to remove any air bubbles.
| Step | Action | Time |
|---|---|---|
| 1 | Cream butter and sugar | 2-3 minutes |
| 2 | Add eggs and vanilla | Until well combined |
| 3 | Combine dry ingredients | 2 minutes |
| 4 | Incorporate wet and dry ingredients | Until just combined |
| 5 | Prepare pans and bake | As per baking instructions |
By following these steps, you’ll be able to create a beautiful and delicious red velvet cake. The key is to be patient and ensure each step is completed thoroughly before moving on to the next.
Baking Your Red Velvet Cake to Perfection
To achieve a moist and flavorful red velvet cake, baking is a critical process. It’s not just about putting the cake in the oven; it’s about ensuring that it’s baked to perfection.
Oven Temperature and Positioning
Preheating your oven to the right oven temperature is crucial. For a standard red velvet cake, preheat your oven to 160°C if it’s fan-forced. Ensure that you position your baking pans correctly to allow for even air circulation. This helps in achieving a uniform bake.
Testing for Doneness
Testing for doneness is a step that shouldn’t be skipped. Bake your cakes for about 30 minutes or until a toothpick inserted into the center comes out clean. This indicates that your cake is perfectly baked.
Cooling Properly
Once your cakes are done, cooling them properly is the next important step. Allow the cakes to cool in the pans for about 20 minutes before transferring them to a wire rack to cool completely. This helps prevent the cakes from breaking apart and ensures they retain their moisture.
Making the Classic Cream Cheese Frosting
Achieving a smooth and tangy cream cheese frosting requires the right ingredients and techniques. The frosting is a crucial element that complements the flavors of your red velvet cake, making it a must-have for any baker.
Ingredients for Smooth, Tangy Frosting
To make a classic cream cheese frosting, you’ll need full-fat, block cream cheese and softened butter. Using high-quality ingredients ensures a smooth and creamy texture. The cream cheese should be at room temperature to avoid lumps, while the butter should be softened to blend seamlessly.
Beating Techniques for Perfect Texture
Beating the cream cheese and butter mixture until it’s smooth and creamy is essential. Start by beating the cream cheese until it’s light and fluffy, then gradually add the softened butter, continuing to beat until fully incorporated. This process ensures a uniform texture that’s neither too stiff nor too runny.
Adjusting Consistency and Sweetness
The consistency and sweetness of your frosting can be adjusted to your liking. If the frosting is too thin, add a small amount of powdered sugar. Conversely, if it’s too thick, a little more cream or butter will do the trick. Taste as you go and adjust the sweetness by adding more powdered sugar or a pinch of salt.
Assembling and Decorating Your Red Velvet Cake
With your cake layers ready, the next step is to bring them together and add a beautiful finish. Assembling and decorating your red velvet cake is a crucial part of the baking process, requiring attention to detail and a bit of creativity.
Leveling Cake Layers
To ensure your cake is even and stable, you’ll need to level your cake layers. Use a serrated knife to carefully trim the tops of each layer. This step is essential for preventing your cake from leaning or toppling over.
Applying the Crumb Coat
A crumb coat is a thin layer of frosting applied to the cake to trap any loose crumbs or debris. Apply a thin layer of frosting to your cake using an offset spatula, making sure to cover the entire surface. Refrigerate the cake for about 10-15 minutes to set the crumb coat.
Frosting Techniques for a Smooth Finish
Once the crumb coat is set, you can apply the final layer of frosting. Use a turntable to spin your cake while you frost it, ensuring an even coat. Hold your spatula at a 90-degree angle to the cake and smooth out the frosting in a continuous motion.
Creative Decoration Ideas
Now it’s time to get creative! You can decorate your red velvet cake with a variety of toppings, such as chopped nuts, shredded coconut, or edible flowers. Consider using a piping bag to create intricate designs or borders.
By following these steps, you’ll be able to create a beautifully assembled and decorated red velvet cake that’s sure to impress your friends and family.
Troubleshooting Common Red Velvet Cake Problems
While red velvet cake is a classic dessert, bakers often encounter a few common problems. Understanding how to troubleshoot these issues can help ensure your cake turns out perfectly.
Fixing a Dry or Dense Cake
A dry or dense cake can be disappointing. To avoid this, check your oven temperature and baking time. Overbaking is a common cause of dryness. Ensure you’re using the right amount of buttermilk, as it helps keep the cake moist. Also, don’t overmix the batter, as this can lead to a dense texture.
Addressing Color Issues
Achieving the right red color can be tricky. Using gel food coloring can help you get a vibrant shade. The quality of the cocoa powder can also affect the color; a higher quality cocoa can result in a deeper red. If your cake isn’t as red as you’d like, consider adjusting the amount of food coloring or the type of cocoa powder you’re using.
Preventing Frosting Mishaps
Frosting issues, such as a too runny or too stiff consistency, can be frustrating. To prevent this, make sure your cream cheese is at room temperature before beating. Gradually add powdered sugar to achieve the desired consistency. If the frosting becomes too warm, refrigerate it for a few minutes to firm it up.
| Issue | Solution |
|---|---|
| Dry or Dense Cake | Check oven temperature, avoid overbaking, use enough buttermilk, and don’t overmix. |
| Color Issues | Use gel food coloring, adjust the amount of coloring, and consider the quality of cocoa powder. |
| Frosting Mishaps | Ensure cream cheese is at room temperature, add powdered sugar gradually, and refrigerate if too warm. |
Serving and Storing Your Red Velvet Cake
Once your red velvet cake is baked and cooled, it’s time to think about serving and storing it. Proper techniques will ensure that your cake remains fresh and delicious for as long as possible.
Perfect Slicing Techniques
To slice your red velvet cake neatly, use a sharp knife dipped in hot water and wiped dry. This will help you achieve clean cuts and prevent the cake from crumbling. For the best results, slice the cake when it’s chilled.
Accompaniments and Serving Suggestions
Serve your red velvet cake with whipped cream or a scoop of vanilla ice cream to enhance its flavor. You can also consider pairing it with fresh fruit or a drizzle of caramel sauce for added variety.
Storage Tips for Freshness
To keep your red velvet cake fresh, store it in an airtight container in the refrigerator. Allow the cake to come to room temperature before serving for the best flavor and texture.
| Storage Method | Duration |
|---|---|
| Room Temperature | Up to 2 days |
| Refrigerator | Up to 5 days |
| Freezer | Up to 2 months |
Conclusion
With these tips and techniques, you’re now equipped to create a stunning red velvet cake that’s sure to impress. By following the step-by-step buttermilk cake recipe and using high-quality ingredients, you’ll achieve a moist and flavorful dessert.
The key to a successful red velvet cake lies in the details, from the precise measurement of ingredients to the gentle folding of the batter. As you’ve learned, the role of buttermilk, cocoa powder, and red food coloring is crucial in creating the cake’s signature taste and appearance.
As you confidently bake and decorate your red velvet cake, you’ll find that the process is just as enjoyable as the end result. So, go ahead and experiment with different decoration ideas and serving suggestions to make your red velvet cake truly special.